Powered by the Ashes: Difference between revisions
mNo edit summary |
PizzaSlice (talk | contribs) mNo edit summary |
||
| (12 intermediate revisions by 4 users not shown) | |||
| Line 1: | Line 1: | ||
Main Questline | ==Main Questline== | ||
<syntaxhighlight> | |||
General Note: Powered by the Ashes Quest is Game Account bound. That means you can enter Ashes maps by all characters on the same Game Account once one of your characters of the same Game Accout has made enough progress in the questline. | |||
</syntaxhighlight> | |||
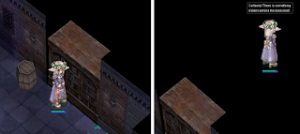
1.Enter '''Geffen Tower''' and head to the basement. Examine the bookshelf you’ll find in the last room before Geffen Dungeon F1. Go behind the bookshelf to discover a hidden passageway that will lead into a secret laboratory.[[File:Ashesq1.png|none|thumb]]2. Go to the top floor of Geffen Tower and speak with '''Wizard Guildsman''' (gef_tower 111,37). He will teleport both of you to the secret laboratory again to investigate the place. After investigation, he will require you to speak with the '''Alchemist Guildsman'''. You will receive an '''Ancient Language Document''' quest item. | |||
3. Speak with '''Alchemist Guildsman''' in Aldebaran Alchemist Guild (alde_alche 27,185). She will advise you to collect some materials for one of her busy student, Zeni. | |||
4. Collect following items and bring them back to Alchemist Guildsman: | |||
* 20 Animal Skin | * 20 Animal Skin | ||
* 10 Bear Footskin | * 10 Bear's Footskin | ||
* 5 Black Hair | *5 Black Hair | ||
You will receive the '''Package for Zeni''' quest item. | You will receive the '''Package for Zeni''' quest item. | ||
5. Go downstairs and head to the first room on the right. After a short cutscene, kill the Bug and speak with '''Zeni'''. She will take both quest items from you, teleport you into the secret laboratory again. She’ll ask to bring her some items: | |||
* 1 Iron | * 1 Iron | ||
* 1 Steel | * 1 Steel | ||
* 3 Emvertacon | * 3 Emvertacon | ||
6. Go to '''Mage Guild''' (''note: NOT the tower or the lab! The Mage Guild is located in the upper left corner of the city'') in Geffen and hand over collected items to Zeni. She will give you the Decay Detector quest item which will enable you to track down the source of the mysterious mineral. | |||
7. Follow navigation arrows and move to '''Floor 3 of Mjolnir Dead Pit''' (mjo_dun03 306,96; | |||
'''''Note:''' remember to visit all the checkpoints on the way and listen to NPC dialogues''). | |||
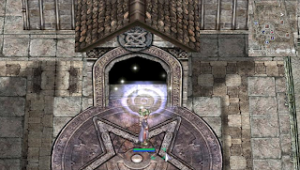
After the final cutscene at Mjonir F3, you will be asked to go to '''Yuno Laboratory''' (yuno 278,289) with '''Geek Glasses and Grandpa Beard equipped''' to get a piece of “Ashium” Mineral. You can buy Geek Glasses in Payon "Glasses and Glamour" NPC and Grandpa Beard in Geffen "Item Vendor" NPC. | |||
[[File:PbtA quest2.png|none|thumb]] | |||
8. Talk to '''Metto''' (yuno_in03 26,39) with Geek Glasses and Grandpa Beard equipped and wait for a cutscene to appear. After this, you will receive the '''Ashium Key''' quest item. | |||
9. Go back to the '''Mjolnir Dead Pit F3''' and find out you were tricked by the enemy. Defend your team from group of soldiers by entering the warp and killing: | |||
* 35 [[Rekenber Mercenary]] | |||
* 25 [[Rekenber Guard]] | |||
* 5 [[Rekenber Soldier]] | |||
'''''Note''': If you are playing a full support character, you must kill at least 1 monster by yourself to complete the quest due to a game limitation'' | |||
You will land in another dimension full of dangerous monsters. Kill some monsters to safely continue investigating new territory with your team: | 10. After surviving the attack you realize that the machine in the mine is still working and you can find out what’s on the other side of the portal. Enter the new warp portal. You will land in another dimension full of dangerous monsters. Kill some monsters to safely continue investigating new territory with your team: | ||
*25 [[Magmawhip]] | |||
* 25 [[Magma Familiar]] | |||
* 10 [[Living Magma]] | |||
'''''Note''': If you are playing a full support character, you must kill at least 1 monster by yourself to complete the quest due to a game limitation'' | |||
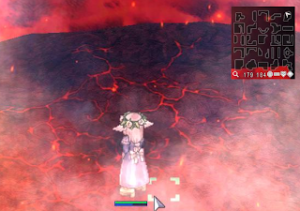
11. After killing all monsters, head to north-east section of the map and find the '''Wormhole''' (ash_dun1 179, 185). After sneaking through the '''Wormhole''', you will be transferred into a safe, South Muspelheim area. | |||
[[File:PbtA quest 3.png|none|thumb]] | |||
12. Find out that the bridge is destroyed and you need to get some metal parts from robots to repair it. To achieve that enter the west warp portal and kill monsters from Scrap Metal PT.1: | |||
*20 [[CORE]] | |||
*15 [[WELDER]] | |||
*5 [[DRILL]] | |||
13. Then enter north warp portal and kill monsters from Scrap Metal PT. 2 quest: | |||
* | *30 [[SCOUT]] | ||
* | * 30 [[FUEL]] | ||
* | '''** Please note that PART 1 OF ASHES ENDS HERE **. There are no quests beyond this point yet.''' | ||
* | |||
== Dungeon Entrance Warps == | |||
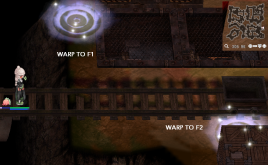
If you would like to enter '''Ashes Dungeon 1F or 2F''' during (or after finishing) the quest, use one of these portals: | |||
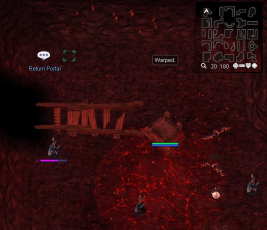
* Entering portals to Ashes 1F and 2F are located in Mjonir 3F. | |||
* Return portal from Ashes 2F to Mjonir 3F is located in north-west area of 2F Ashes map. | |||
[[File:Ashes warpF1 F2.png|thumb|268x268px|none]] | |||
[[File:Ashes warpF1.png|thumb|267x267px|none]] | |||
Monsters | There is an NPC outside Dead Mine that will warp all characters on the Game Account to the Ashes maps once one of your characters has made enough progress in the questline. To get to '''Ashes Dungeon 2F or 3F''' fast, just speak with NPC Zeni which will appear next to Mjonir Dead Pit Entrance. She'll teleport you to safe Bridge Area. | ||
[[File:Ashes warpBridge.png|thumb|268x268px|none]] | |||
==Monsters == | |||
=== 1F === | ===1F=== | ||
First dungeon floor is suitable for late 1st job and early 2nd job chars. | First dungeon floor is suitable for late 1st job and early 2nd job chars. | ||
{| class="wikitable" | {| class="wikitable" | ||
| Line 65: | Line 80: | ||
|Base Exp | |Base Exp | ||
|Job Exp | |Job Exp | ||
|Size | |Size | ||
|Element | |Element | ||
|Race | |Race | ||
|Spawn | |||
|- | |- | ||
|Rekenber Soldier | |[[Rekenber Soldier]] | ||
|7200 | |7200 | ||
|2916 | |2916 | ||
| Line 76: | Line 92: | ||
|Neutral 1 | |Neutral 1 | ||
|Demi-Human | |Demi-Human | ||
|10 | |||
|- | |- | ||
|Rekenber Guard | |[[Rekenber Guard]] | ||
|4400 | |4400 | ||
|2208 | |2208 | ||
| Line 84: | Line 101: | ||
|Neutral 1 | |Neutral 1 | ||
|Demi-Human | |Demi-Human | ||
|35 | |||
|- | |- | ||
|Rekenber Mercenary | |[[Rekenber Mercenary]] | ||
|4700 | |4700 | ||
|2496 | |2496 | ||
| Line 92: | Line 110: | ||
|Neutral 1 | |Neutral 1 | ||
|Demi-Human | |Demi-Human | ||
|60 | |||
|- | |- | ||
|Rekenber General | |[[Rekenber General]] | ||
|41700 | |41700 | ||
|39000 | | 39000 | ||
|21000 | |21000 | ||
|Medium | |Medium | ||
|Neutral 1 | | Neutral 1 | ||
|Demi-Human | |Demi-Human | ||
|1 | |||
|} | |} | ||
=== 2F === | ===2F=== | ||
Second dungeon floor should fit characters in a party around level 70+ and level 85+ solo players. | Second dungeon floor should fit characters in a party around level 70+ and level 85+ solo players. | ||
{| class="wikitable" | {| class="wikitable" | ||
| Line 109: | Line 129: | ||
|Base Exp | |Base Exp | ||
|Job Exp | |Job Exp | ||
|Size | | Size | ||
|Element | |Element | ||
|Race | |Race | ||
|Spawn | |||
|- | |- | ||
|Magma Familiar | |[[Magma Familiar]] | ||
|11900 | |11900 | ||
|4500 | |4500 | ||
| Line 120: | Line 141: | ||
|Fire 2 | |Fire 2 | ||
|Formless | |Formless | ||
|50 | |||
|- | |- | ||
|Magmawhip | |[[Magmawhip]] | ||
|14100 | |14100 | ||
|5304 | |5304 | ||
| Line 128: | Line 150: | ||
|Fire 2 | |Fire 2 | ||
|Dragon | |Dragon | ||
|50 | |||
|- | |- | ||
|Living Magma | |[[Living Magma]] | ||
|18300 | |18300 | ||
|6552 | |6552 | ||
| Line 136: | Line 159: | ||
|Fire 3 | |Fire 3 | ||
|Formless | |Formless | ||
|20 | |||
|- | |- | ||
|Ignis | |[[Ignis]] | ||
|83200 | |83200 | ||
|67560 | |67560 | ||
| Line 144: | Line 168: | ||
|Fire 3 | |Fire 3 | ||
|Formless | |Formless | ||
|1 | |||
|- | |- | ||
|WELDER | |[[WELDER]] | ||
|21800 | |21800 | ||
|15480 | |15480 | ||
| Line 152: | Line 177: | ||
|Wind 2 | |Wind 2 | ||
|Formless | |Formless | ||
|1 | |||
|- | |- | ||
|CORE | |[[CORE]] | ||
|15800 | |15800 | ||
|9900 | |9900 | ||
| Line 159: | Line 185: | ||
|Small | |Small | ||
|Fire 2 | |Fire 2 | ||
|Formless | | Formless | ||
|3 | |||
|} | |} | ||
=== 3F === | ===3F=== | ||
Third dungeon floor should fit characters in a party around level 85+ and level 95+ solo players. | Third dungeon floor should fit characters in a party around level 85+ and level 95+ solo players. | ||
{| class="wikitable" | {| class="wikitable" | ||
| Line 172: | Line 199: | ||
|Element | |Element | ||
|Race | |Race | ||
|Spawn | |||
|- | |- | ||
|WELDER | |[[WELDER]] | ||
|21800 | |21800 | ||
|15480 | |15480 | ||
| Line 180: | Line 208: | ||
|Wind 2 | |Wind 2 | ||
|Formless | |Formless | ||
|12 | |||
|- | |- | ||
|SCOUT | |[[SCOUT]] | ||
|18000 | |18000 | ||
|12000 | |12000 | ||
| Line 188: | Line 217: | ||
|Fire 2 | |Fire 2 | ||
|Demon | |Demon | ||
|20 | |||
|- | |- | ||
|FUEL | |[[FUEL]] | ||
|20900 | |20900 | ||
|16440 | |16440 | ||
| Line 196: | Line 226: | ||
|Fire 3 | |Fire 3 | ||
|Formless | |Formless | ||
|15 | |||
|- | |- | ||
|DRILL | |[[DRILL]] | ||
|31100 | |31100 | ||
|23280 | |23280 | ||
| Line 204: | Line 235: | ||
|Fire 3 | |Fire 3 | ||
|Formless | |Formless | ||
|4 | |||
|- | |- | ||
|CORE | |[[CORE]] | ||
|15800 | |15800 | ||
|9900 | |9900 | ||
| Line 212: | Line 244: | ||
|Fire 2 | |Fire 2 | ||
|Formless | |Formless | ||
|20 | |||
|- | |- | ||
|MAID | |[[MAID]] | ||
|156200 | |156200 | ||
|82920 | |82920 | ||
|52080 | |52080 | ||
|Medium | |Medium | ||
|Ghost | |Ghost 3 | ||
|Formless | |Formless | ||
|1 | |||
|} | |} | ||
Latest revision as of 12:41, 5 June 2023
Main Questline
General Note: Powered by the Ashes Quest is Game Account bound. That means you can enter Ashes maps by all characters on the same Game Account once one of your characters of the same Game Accout has made enough progress in the questline.1.Enter Geffen Tower and head to the basement. Examine the bookshelf you’ll find in the last room before Geffen Dungeon F1. Go behind the bookshelf to discover a hidden passageway that will lead into a secret laboratory.
2. Go to the top floor of Geffen Tower and speak with Wizard Guildsman (gef_tower 111,37). He will teleport both of you to the secret laboratory again to investigate the place. After investigation, he will require you to speak with the Alchemist Guildsman. You will receive an Ancient Language Document quest item.
3. Speak with Alchemist Guildsman in Aldebaran Alchemist Guild (alde_alche 27,185). She will advise you to collect some materials for one of her busy student, Zeni.
4. Collect following items and bring them back to Alchemist Guildsman:
- 20 Animal Skin
- 10 Bear's Footskin
- 5 Black Hair
You will receive the Package for Zeni quest item.
5. Go downstairs and head to the first room on the right. After a short cutscene, kill the Bug and speak with Zeni. She will take both quest items from you, teleport you into the secret laboratory again. She’ll ask to bring her some items:
- 1 Iron
- 1 Steel
- 3 Emvertacon
6. Go to Mage Guild (note: NOT the tower or the lab! The Mage Guild is located in the upper left corner of the city) in Geffen and hand over collected items to Zeni. She will give you the Decay Detector quest item which will enable you to track down the source of the mysterious mineral.
7. Follow navigation arrows and move to Floor 3 of Mjolnir Dead Pit (mjo_dun03 306,96;
Note: remember to visit all the checkpoints on the way and listen to NPC dialogues).
After the final cutscene at Mjonir F3, you will be asked to go to Yuno Laboratory (yuno 278,289) with Geek Glasses and Grandpa Beard equipped to get a piece of “Ashium” Mineral. You can buy Geek Glasses in Payon "Glasses and Glamour" NPC and Grandpa Beard in Geffen "Item Vendor" NPC.
8. Talk to Metto (yuno_in03 26,39) with Geek Glasses and Grandpa Beard equipped and wait for a cutscene to appear. After this, you will receive the Ashium Key quest item.
9. Go back to the Mjolnir Dead Pit F3 and find out you were tricked by the enemy. Defend your team from group of soldiers by entering the warp and killing:
Note: If you are playing a full support character, you must kill at least 1 monster by yourself to complete the quest due to a game limitation
10. After surviving the attack you realize that the machine in the mine is still working and you can find out what’s on the other side of the portal. Enter the new warp portal. You will land in another dimension full of dangerous monsters. Kill some monsters to safely continue investigating new territory with your team:
- 25 Magmawhip
- 25 Magma Familiar
- 10 Living Magma
Note: If you are playing a full support character, you must kill at least 1 monster by yourself to complete the quest due to a game limitation
11. After killing all monsters, head to north-east section of the map and find the Wormhole (ash_dun1 179, 185). After sneaking through the Wormhole, you will be transferred into a safe, South Muspelheim area.
12. Find out that the bridge is destroyed and you need to get some metal parts from robots to repair it. To achieve that enter the west warp portal and kill monsters from Scrap Metal PT.1:
13. Then enter north warp portal and kill monsters from Scrap Metal PT. 2 quest:
** Please note that PART 1 OF ASHES ENDS HERE **. There are no quests beyond this point yet.
Dungeon Entrance Warps
If you would like to enter Ashes Dungeon 1F or 2F during (or after finishing) the quest, use one of these portals:
- Entering portals to Ashes 1F and 2F are located in Mjonir 3F.
- Return portal from Ashes 2F to Mjonir 3F is located in north-west area of 2F Ashes map.
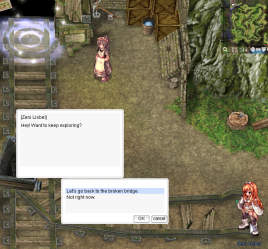
There is an NPC outside Dead Mine that will warp all characters on the Game Account to the Ashes maps once one of your characters has made enough progress in the questline. To get to Ashes Dungeon 2F or 3F fast, just speak with NPC Zeni which will appear next to Mjonir Dead Pit Entrance. She'll teleport you to safe Bridge Area.
Monsters
1F
First dungeon floor is suitable for late 1st job and early 2nd job chars.
| Name | HP | Base Exp | Job Exp | Size | Element | Race | Spawn |
| Rekenber Soldier | 7200 | 2916 | 2364 | Medium | Neutral 1 | Demi-Human | 10 |
| Rekenber Guard | 4400 | 2208 | 1824 | Medium | Neutral 1 | Demi-Human | 35 |
| Rekenber Mercenary | 4700 | 2496 | 1524 | Medium | Neutral 1 | Demi-Human | 60 |
| Rekenber General | 41700 | 39000 | 21000 | Medium | Neutral 1 | Demi-Human | 1 |
2F
Second dungeon floor should fit characters in a party around level 70+ and level 85+ solo players.
| Name | HP | Base Exp | Job Exp | Size | Element | Race | Spawn |
| Magma Familiar | 11900 | 4500 | 2520 | Small | Fire 2 | Formless | 50 |
| Magmawhip | 14100 | 5304 | 3516 | Small | Fire 2 | Dragon | 50 |
| Living Magma | 18300 | 6552 | 3924 | Large | Fire 3 | Formless | 20 |
| Ignis | 83200 | 67560 | 28200 | Large | Fire 3 | Formless | 1 |
| WELDER | 21800 | 15480 | 8640 | Large | Wind 2 | Formless | 1 |
| CORE | 15800 | 9900 | 8040 | Small | Fire 2 | Formless | 3 |
3F
Third dungeon floor should fit characters in a party around level 85+ and level 95+ solo players.
| Name | HP | Base Exp | Job Exp | Size | Element | Race | Spawn |
| WELDER | 21800 | 15480 | 8640 | Large | Wind 2 | Formless | 12 |
| SCOUT | 18000 | 12000 | 11040 | Small | Fire 2 | Demon | 20 |
| FUEL | 20900 | 16440 | 11760 | Small | Fire 3 | Formless | 15 |
| DRILL | 31100 | 23280 | 14160 | Large | Fire 3 | Formless | 4 |
| CORE | 15800 | 9900 | 8040 | Small | Fire 2 | Formless | 20 |
| MAID | 156200 | 82920 | 52080 | Medium | Ghost 3 | Formless | 1 |
